Digital Photography and Imaging - Project 1
Task 1: Exercise 1 (Digital Collage) & Exercise 2 (Digital Imaging)
Table of the contents
1.Lectures
3.Three of my favorite posters on the Internet
4.PROJECT 1A: COLLAGE DESIGN ELEMEN
TS
5.PROJECT 1A: PHYSICAL COLLAGE final review
6.PROJECT 1B: Digital Collage review
7.PROJECT 1B: DIGITAL IMAGING EXERCISE
8.PROJECT 1B - PART 2: Recoloring Black and White
9.Reflections
Week 1:
INTRODUCTION TO DIGITAL PHOTOGRAPHY & IMAGING
-a.Photoshop opens up a door of endless opportunities.We can also create web site formats utilizing this software program.We can develop the format of a business card, poster, greeting card and also far more.
The importance of Photoshop for the Graphic Designer
Restoration of old images
-a We can bring back those old photos as well as experience the pleasing memories. Utilizing Photoshop’s healing brush, clone stamp, as well as patch tools worn pictures can be recovered.
Integrate graphics with text artistically
-b Photoshop offers you the adaptability to blend as well as match pictures with a message to produce the preferred impact. pictures can be boosted by tweaking lighting, contrast as well as sharpness.
Make use of brushes
-c There are thousands of brushes offered.Using a grass brush, you can finish the job within a couple of mins.
Change photo color
-d You can transform a colored photo right into black and white with the help of this image editing tool.
Rectify mistakes in photographs
-e we can conceal the weak points as well as boost the aesthetic allure of the photos. You can additionally crop some parts of a picture if it is unneeded.
Photograph manipulation
 |
| -a Photograph manipulation involves the transformation or alteration of a photograph |
 |
| Australian photographer Frank Hurley formed this composite photograph from three original negatives of World War I Belgium. |
https://en.wikipedia.org/wiki/Photograph_manipulation
 |
Goebbels family portrait photo in which the visage of the uniformed Harald, who was actually away on military duties, was inserted and retouched https://en.wikipedia.org/wiki/Photograph_manipulation |

h.Scaling Artworks and Proportions
i.Use Actions to Personalize Work
j.Organize the Files Properly
INSTRUCTION:
WeeK 2
Introduction to basic composition.
FOCAL POINT
 |
| A key element to any good composition is a strong focal point
|
 |
| Scale is often used to help communicate hierarchy by drawing attention toward and away from certain elements |
BALANCE THE ELEMENTS
 |
| A good technique for mastering asymmetrical balance is to think of each element as having a ‘weight’ to it. |
WHITE SPACE
 |
| White space when used strategically can help boost your design’s clarity and overall look by balancing out the more complicated and busy parts of your composition with space that helps your design to breathe.
WHITE SPACE  Rule of Thirds. 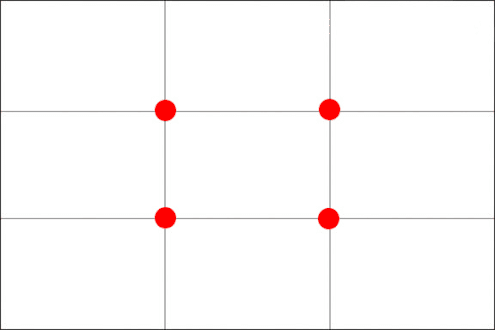 |
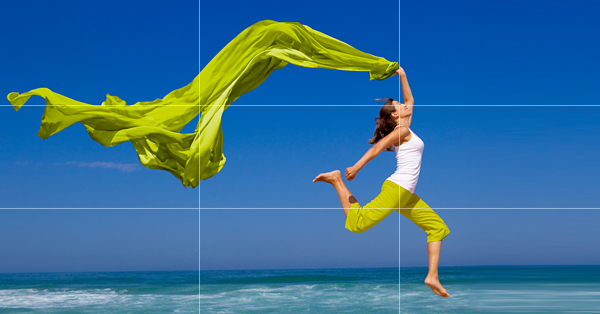
When you position the most important elements of your image at these intersection points, you produce a much more natural image. It is also suggested that any horizon is placed on either the top horizontal line or bottom horizontal line.
The Rule of Thirds is a way to:
Use composition techniques that are in line with what’s naturally pleasing to the eye.
Creatively use negative space.
Create conversation between the subject and background.
https://artplusmarketing.com/winning-composition-using-the-rule-of-thirds-in-desin-41bb6d48b409
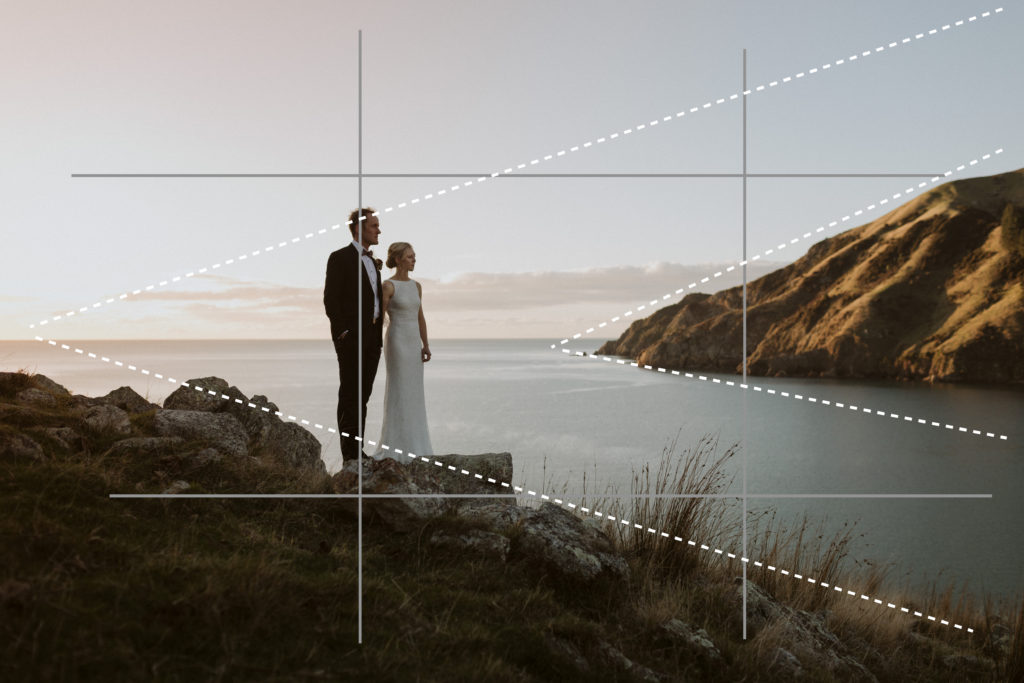
Golden Ratio.
 |
| The Golden Ratio is a mathematical ratio.
https://www.canva.com/learn/what-is-the-golden-ratio/ Composition [Framing & Cropping] |
Week 3:
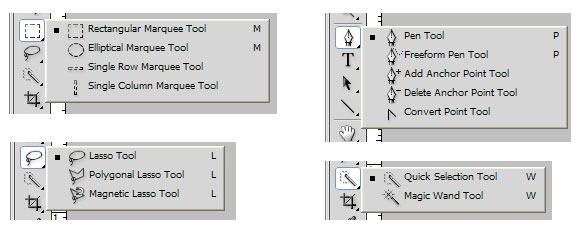
How to Use the Lasso Tool
 |
The Lasso Tool allow you to draw and pinpoint specific areas of a document. |
When you click on the Lasso Tool from the Toolbar, you will see three different tool options:
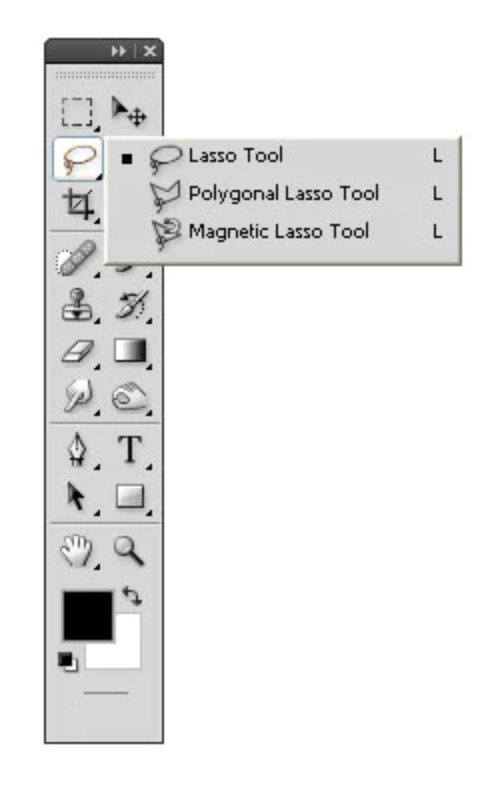
Lasso
Polygonal Lasso
Magnetic Lasso
How to Use the Pen Tool
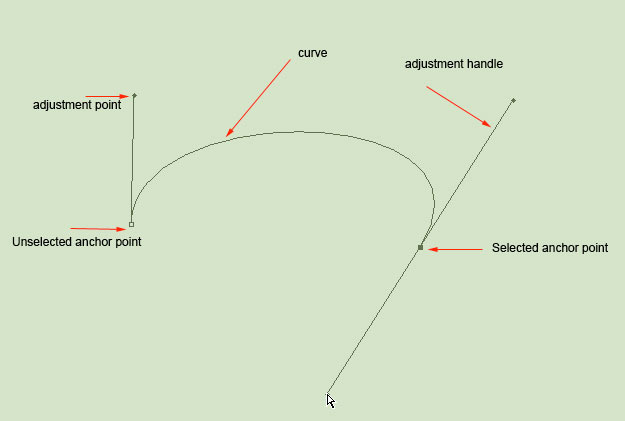 |
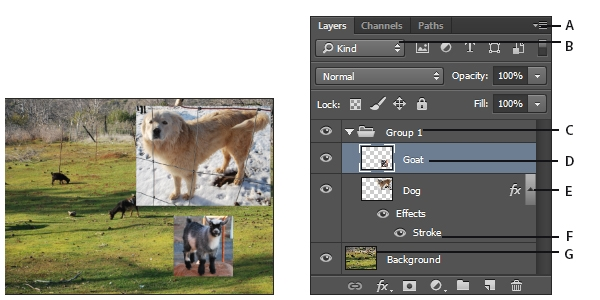
The pen tool is the way that you add these points and the way you drag the tool as you create the points determines how they will look. Variation of Pen Tool 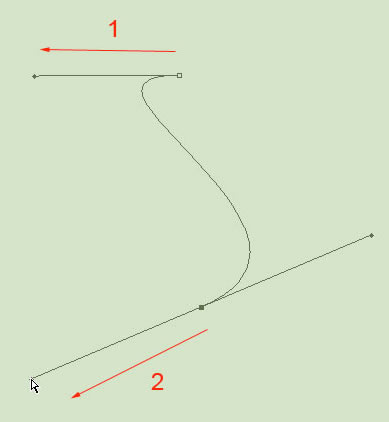 How to Use the Pen Tool Layering How to use Layer in Photoshop we can use each layer without affecting another one to make adjustments. |
REFERENCE:
Mastering selections in Photoshop: The Lasso Tool
https://bit.ly/3uIrIUN
Drawing paths with the Pen Tool
https://bit.ly/3e0uspY
How to start using Photoshop Layers
https://expertphotography.com/photoshop-layers
Week4
Introduction to Photoshop 3
Adjustment Layer & Filters
Adjustment Layer
Adjustment Layer
& Filters
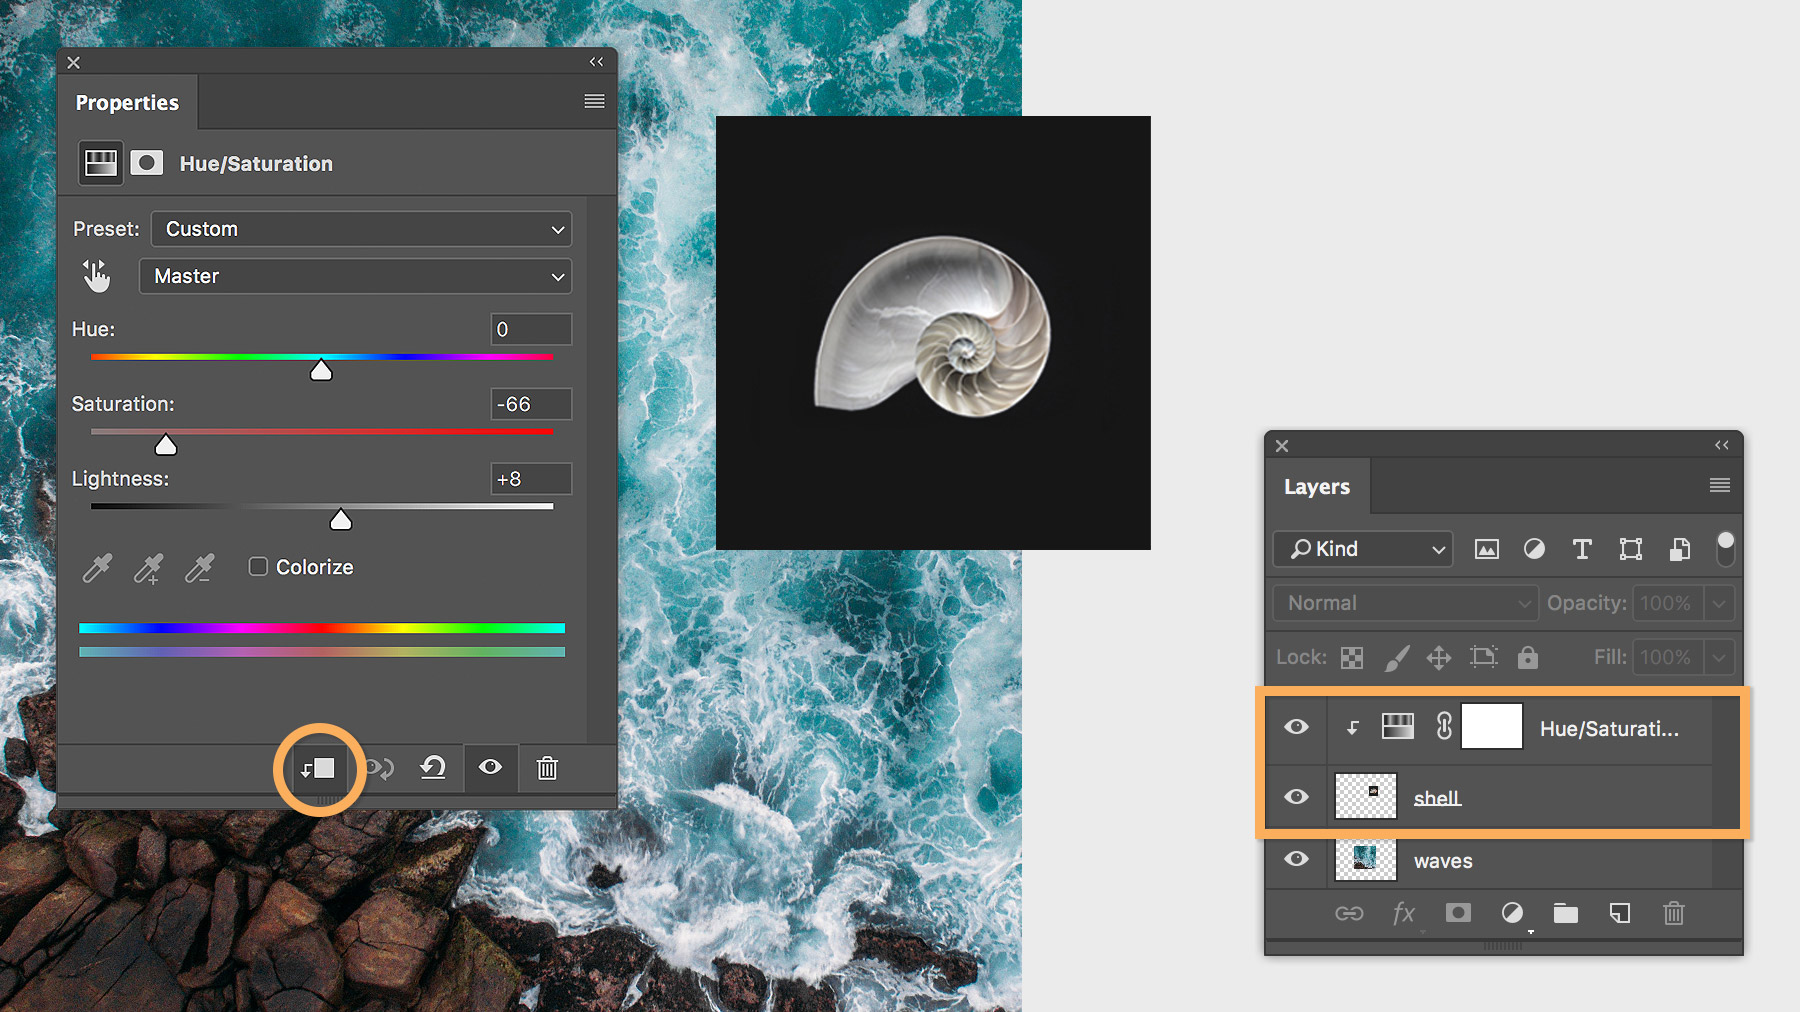
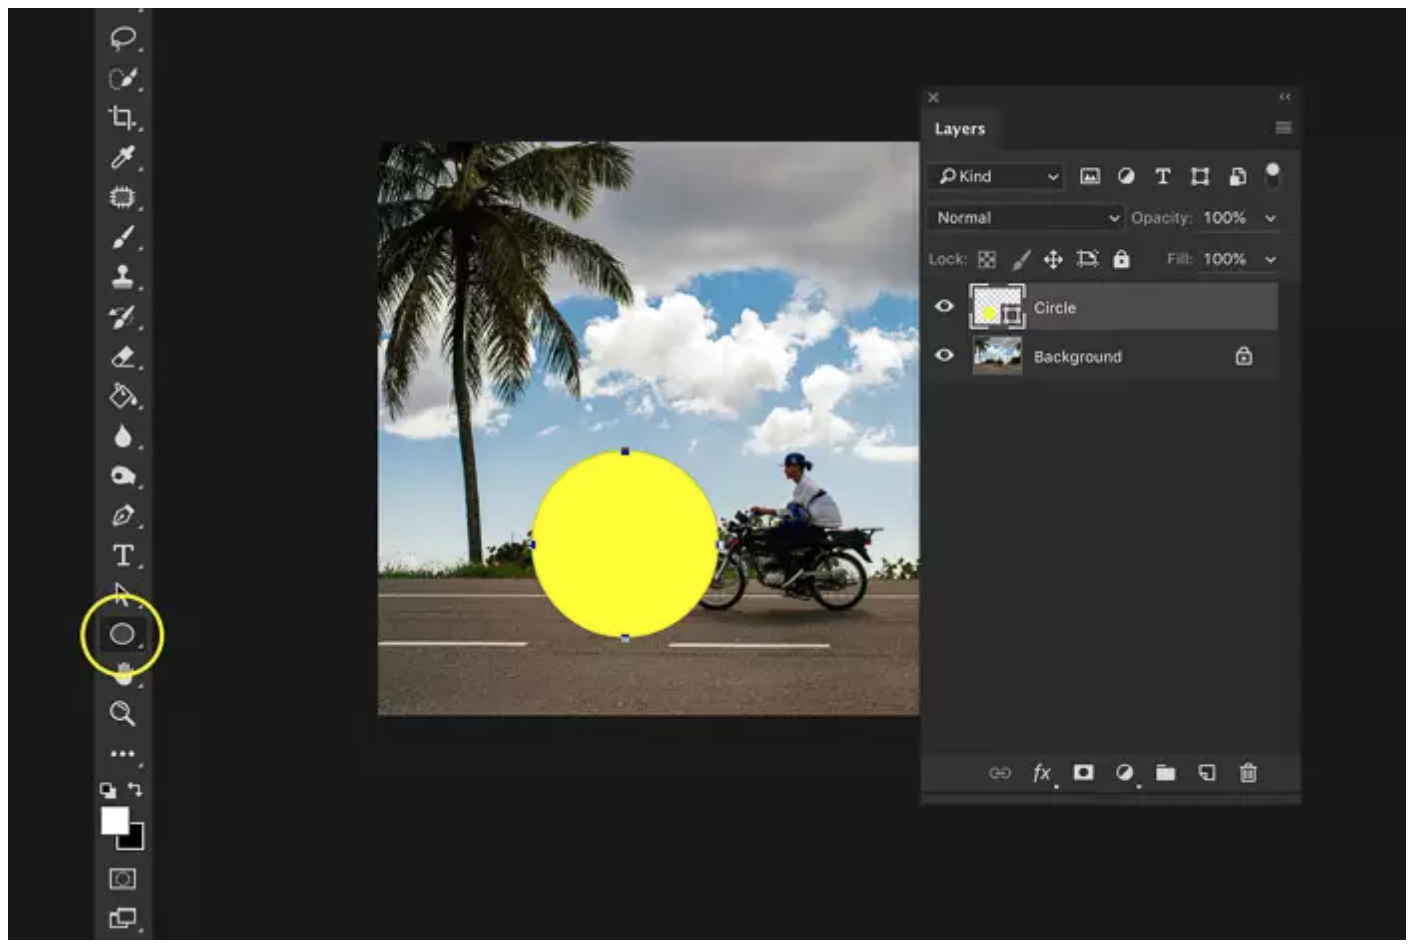
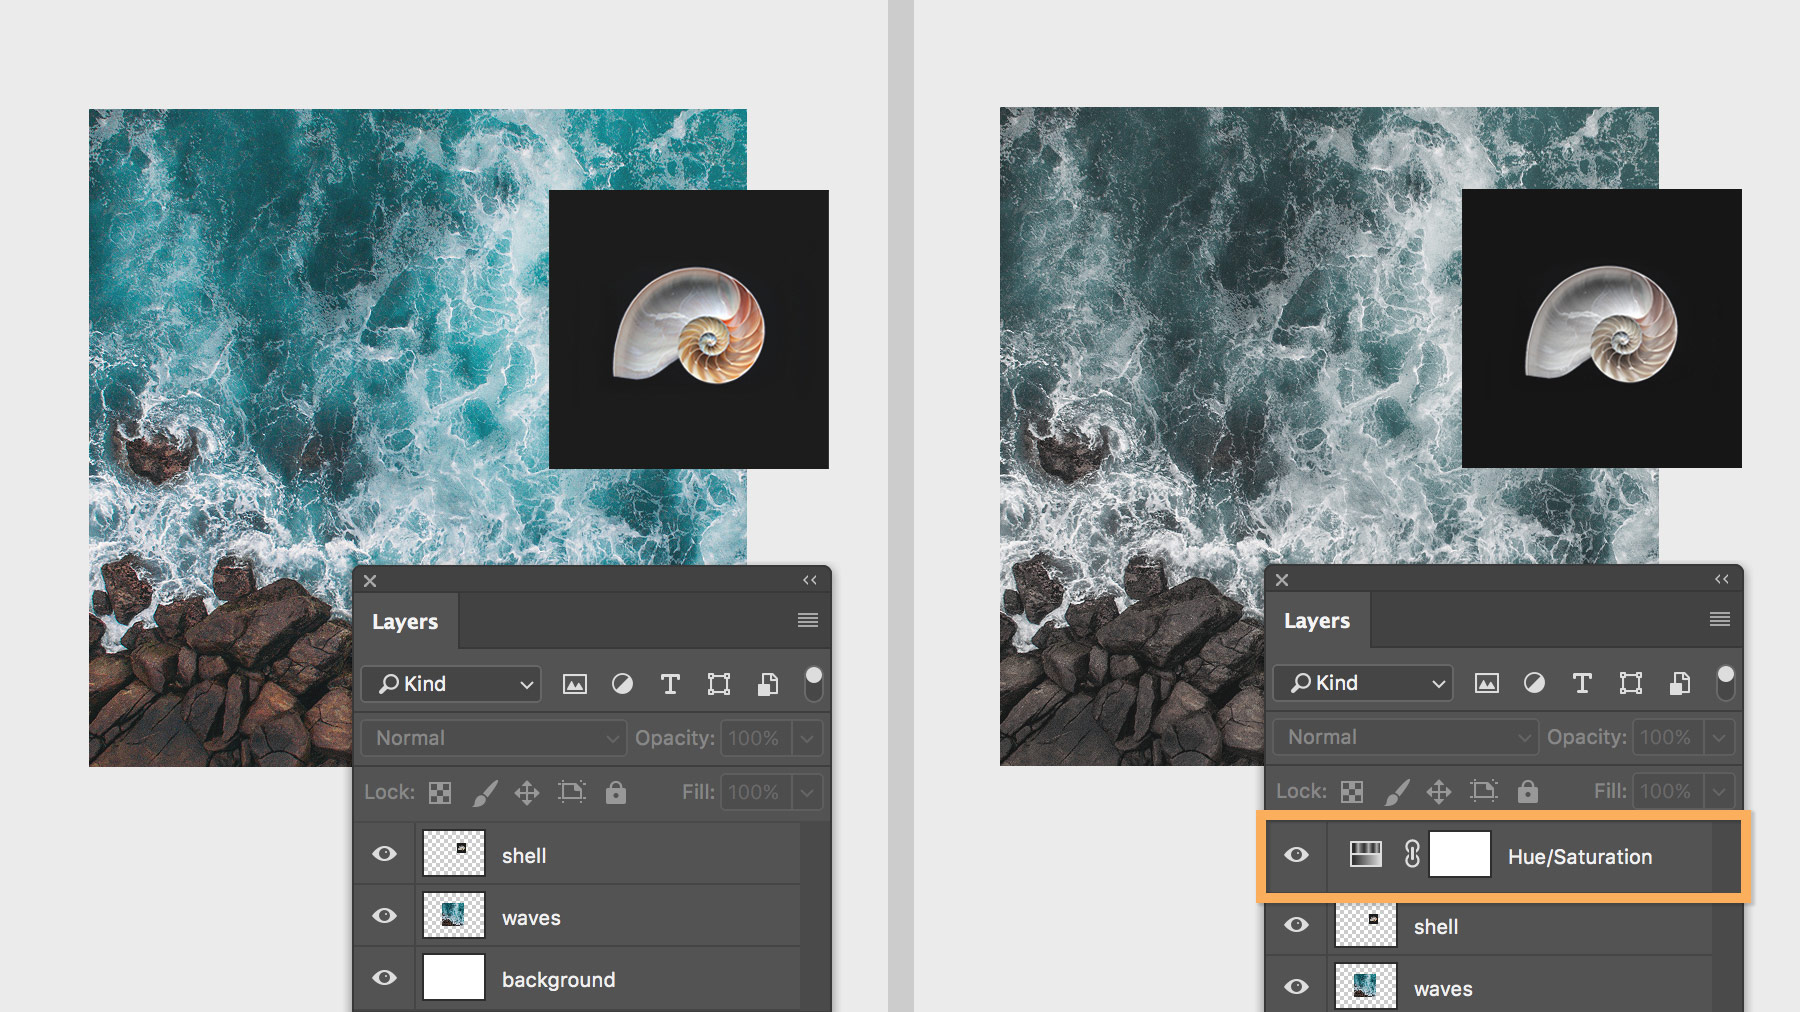
The Adjustment Layers in Photoshop are a group of a super useful, non-destructive image editing tools that add color and tonal adjustments to your image without permanently changing its pixels.
Basic understanding of Adjustment Layer
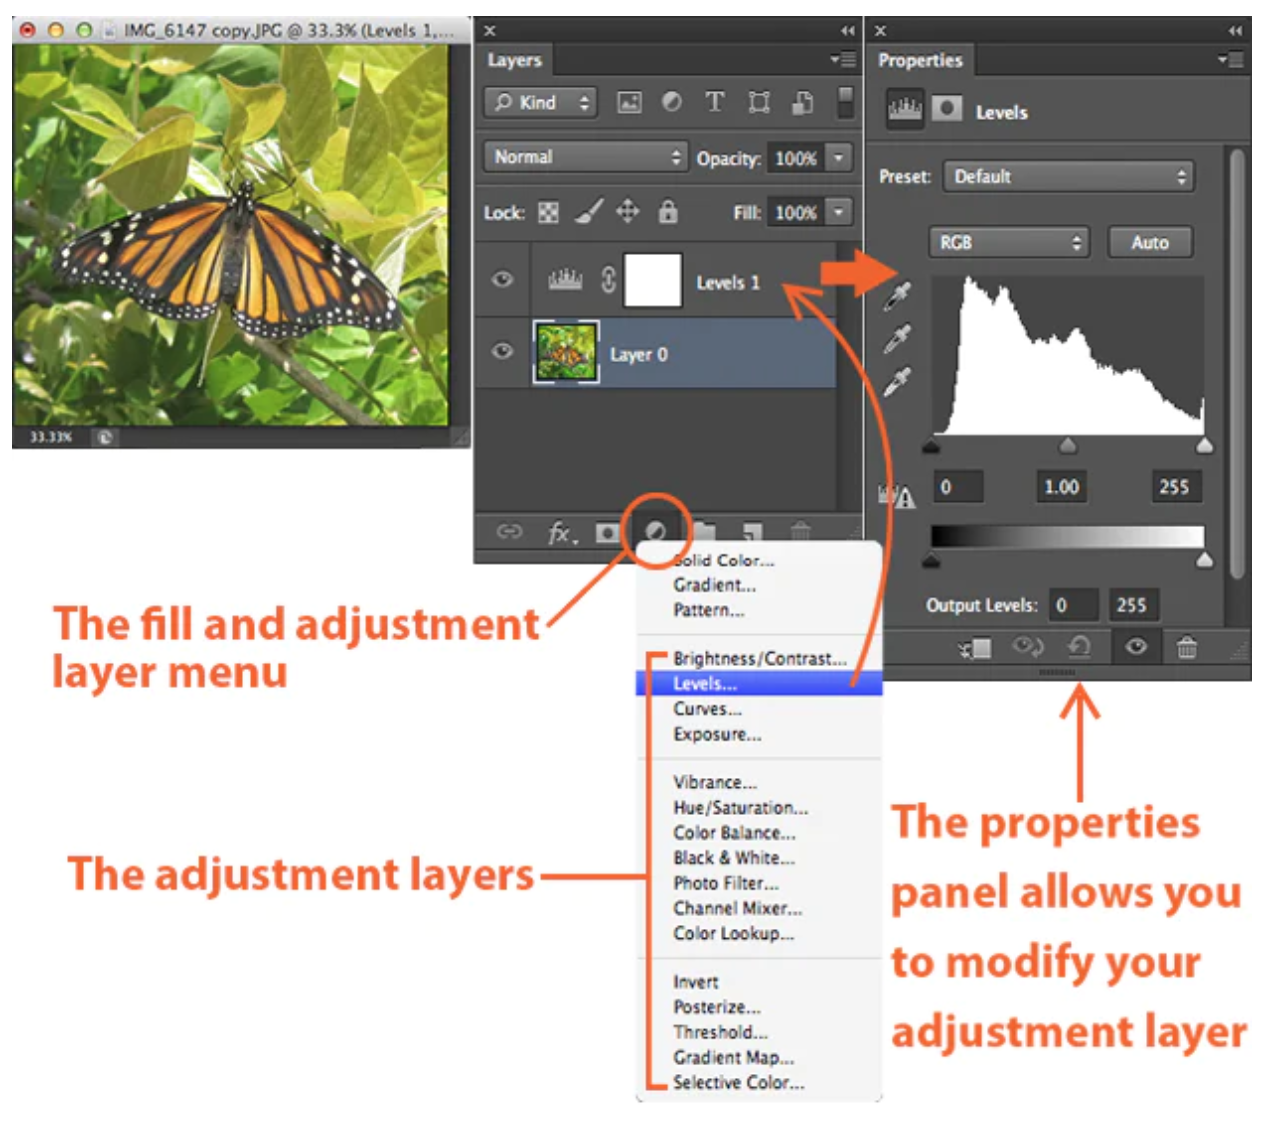
The Properties panel will allow you to modify your adjustment layer,
which in turn will modify your image.
1. BRIGHTNESS / CONTRAST
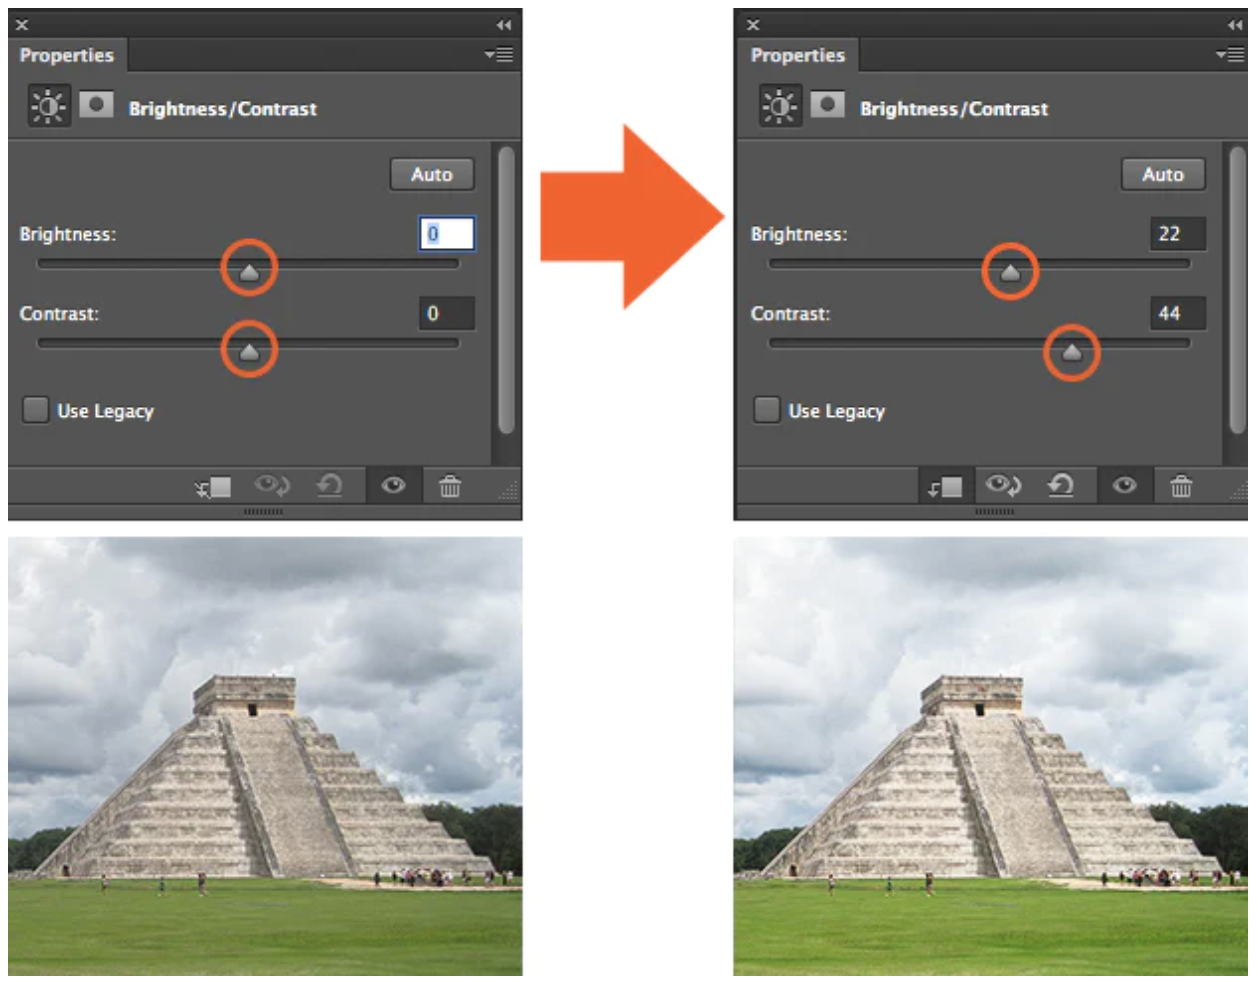 |
The brightness slider is for adjusting the highlights in your image and the Contrast slider is for adjusting the shadows in your image.
2.LEVEL
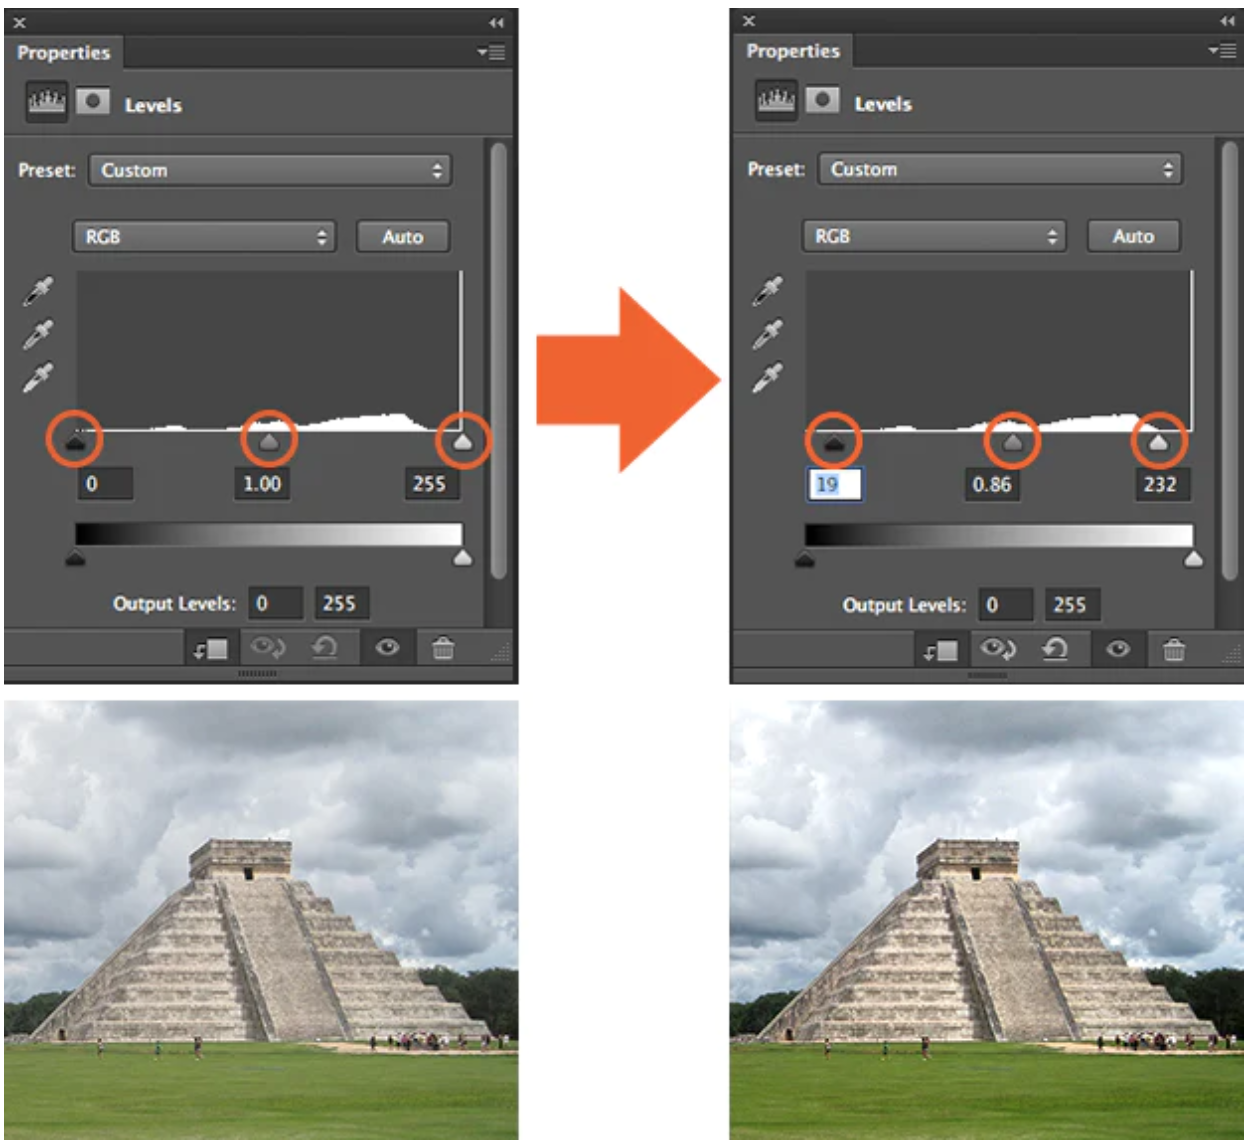 |
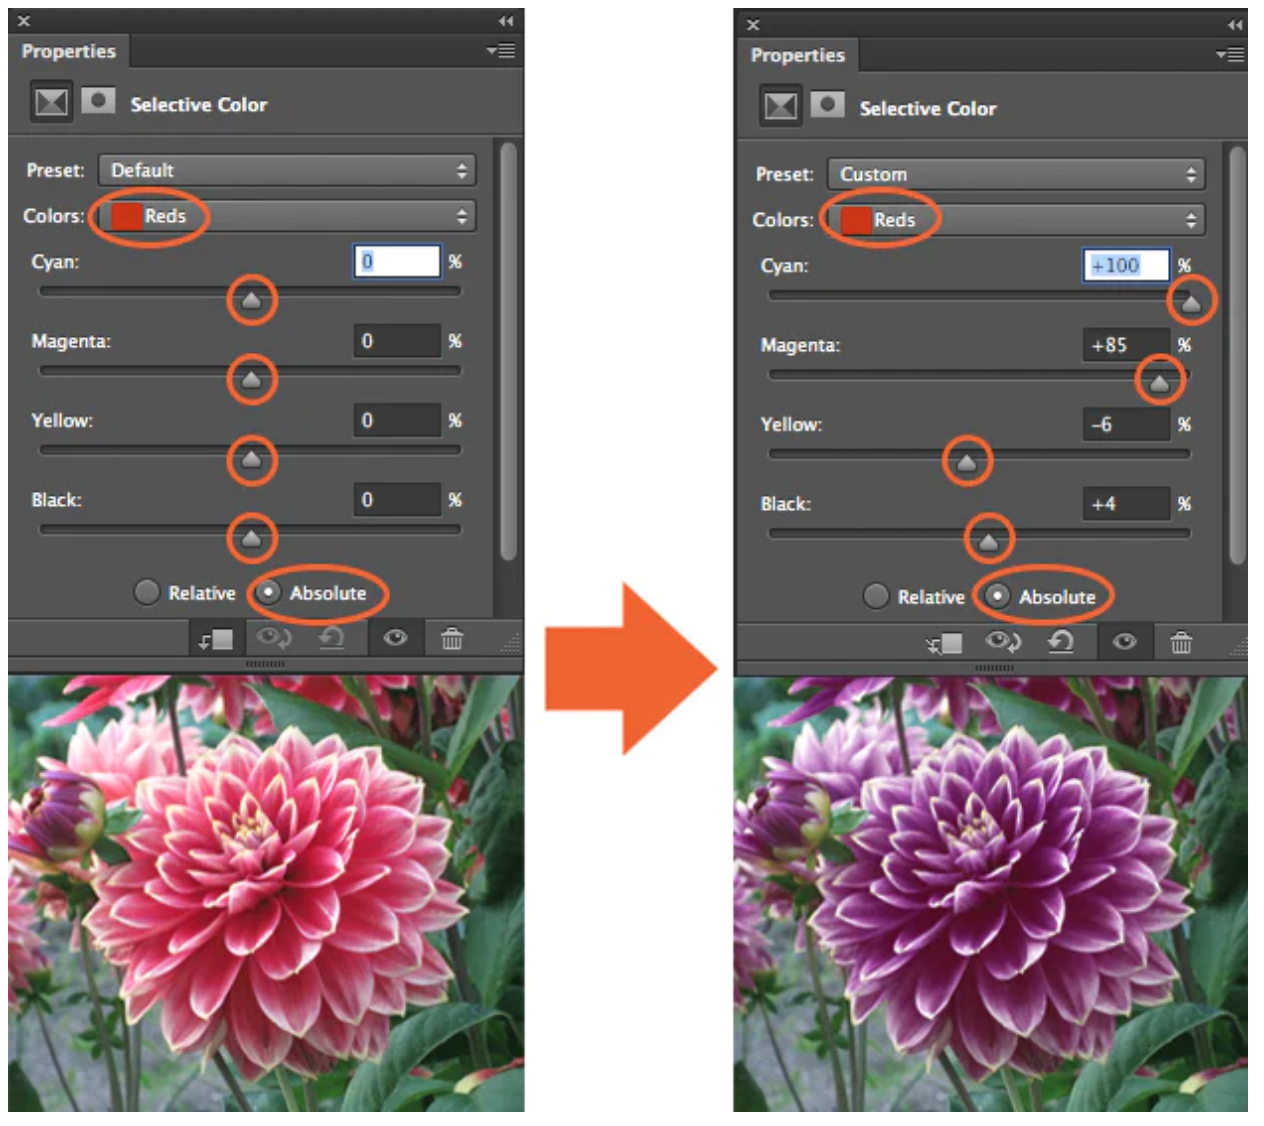
Levels modify the tonal values in an image by adjusting the levels of the shadows, midtones, and highlights. 3. CURVES 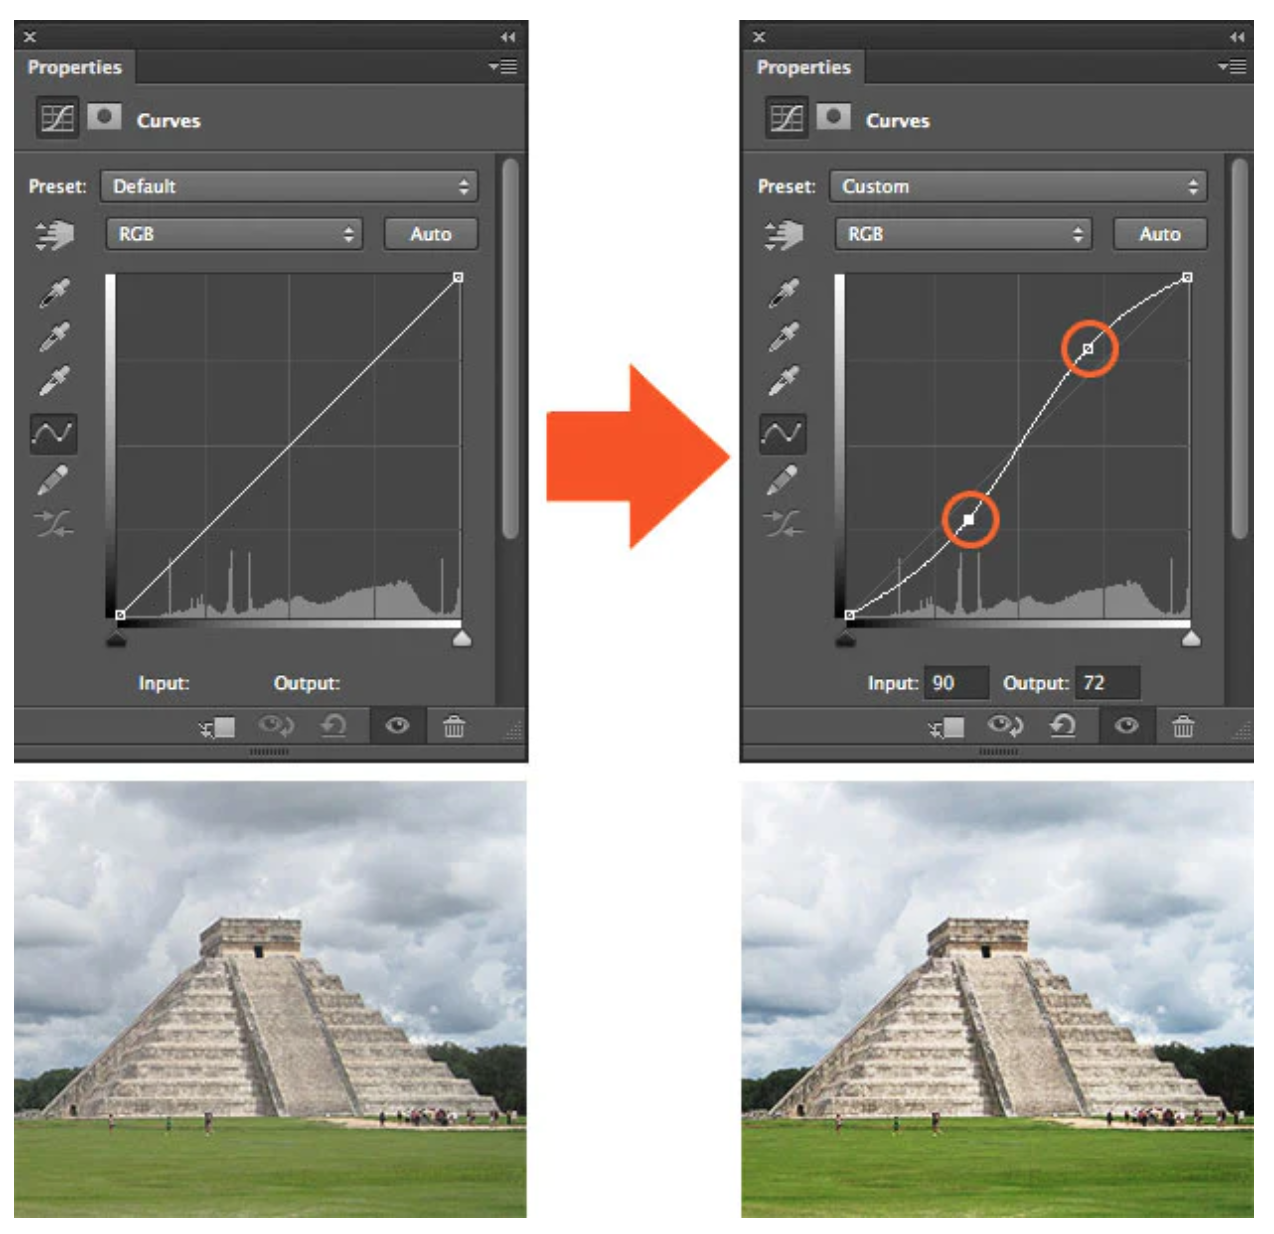 Curves let you adjust as many points as you want throughout the entire tonal range of your image 4. EXPOSURE 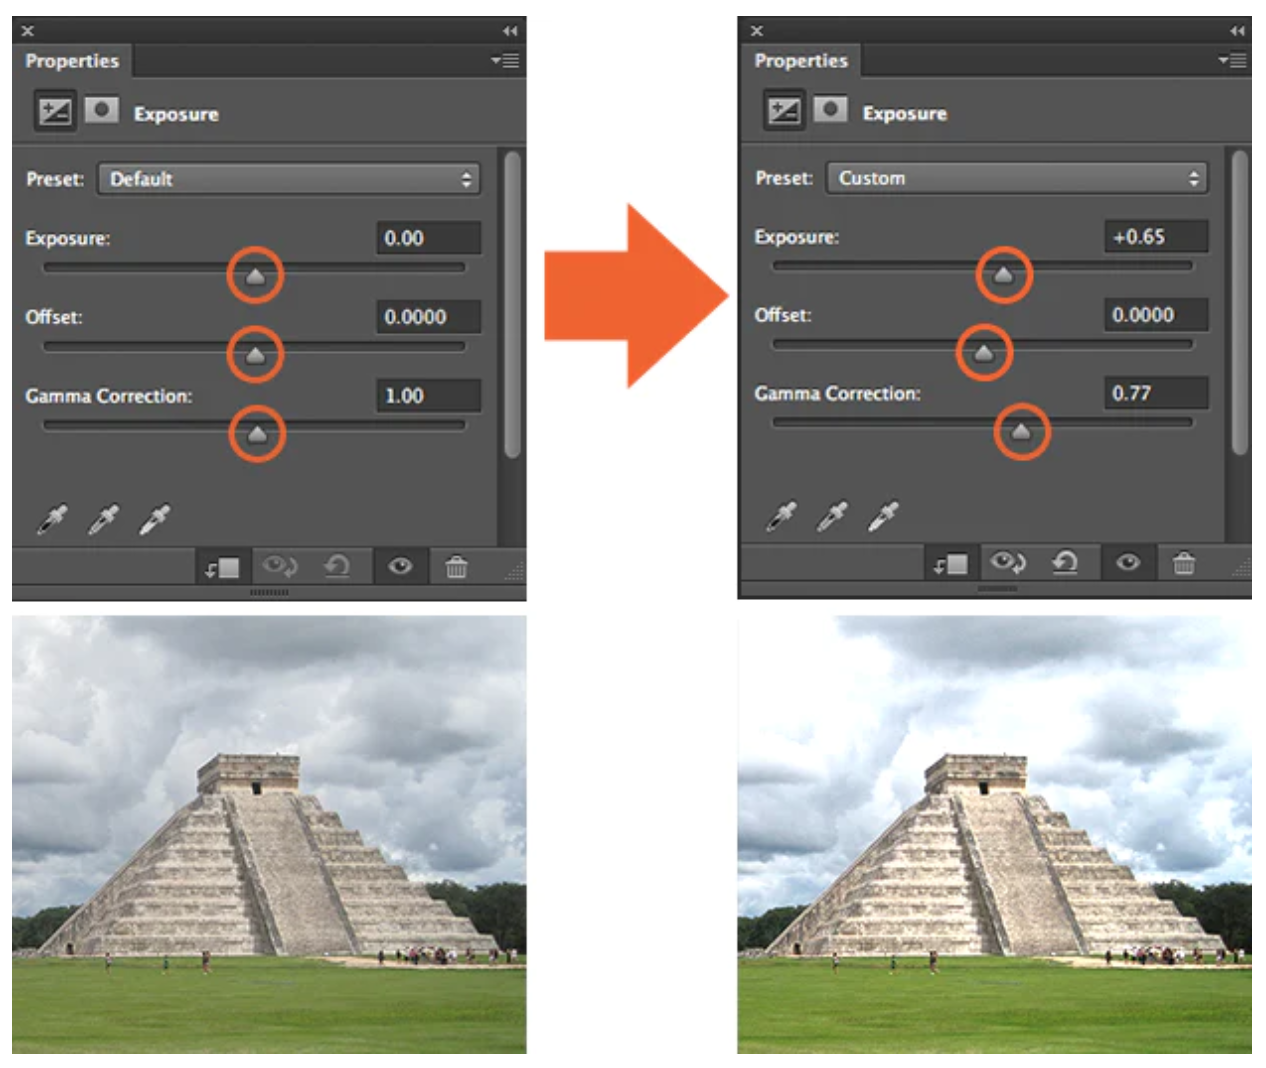 Exposure lets you adjust exposure levels with three sliders: Exposure, Offset and Gamma. 5. SELECTIVE COLOR |
Filters
Using filters to edit photos is an essential element of Adobe’s graphics editor.
REFERENCE:
How to use Adjustment Layer.
Photo filter trick in Photoshop
https://youtu.be/gDSbfx67MLg
Photoshop filters
https://fixthephoto.com/photoshop-filters.html#:~:text=Photoshop%20i
mage%20filters%20are%20defined,retouching%20and%20improve%20image%20quality.
Week : 5
DIGITAL PHOTOGRAPHY
EXPOSURE SETTING

exposure is the amount of light which reaches your camera sensor or film.
The main parts of the camera:
Camera body:
Shutter
Image sensor
LCD screen
Camera lens:
Aperture/ Iris

IRIS
SHUTTER SPEED
ISO

IRIS: Iris/Aperture is control the flow of light entering the lens.

IRIS: Iris/Aperture is measured by f-stop, indicated by
sequence of f-number: f/1, f/1.4, f/2 , f/ 2.8, f/ 4, f/ 5.6, f/ 8, f/ 11, f/ 16,
f/22 , f/32..
The lower the f-number, the larger the lens opening.

he shutter is a small plastic sheet that opens and closes to
allow light onto the film or prevent light from reaching the film.

SHUTTER SPEED: Shutter speed is measured in seconds:
1/1000 s,1/500 s,1/250 s,1/125 s,1/60 s,1/30 s,1/15 s,1/8 s,
1/4 s,1/2 s,1 s, 2 s, 3 s…


ISO: Originally referred to the sensitivity of film—it's "light gathering" ability. For digital photography

ISO: The common ISO camera settings are: 100, 200,
400, 640, 800, 1600, 3200, 6400….

ISO:
The lower the number of ISO the less sensitive your camera is to light
and the finer the grain.

The are wide angle lens, standard lens and tele lens.

Appropriate lens provided desire framing, lens choice affects angle of view.
LENS PERSPECTIVE
Different lenses are designed for different for different purposes. Lenses can be categorized by FOCAL LENGTH.

FOCAL LENGTH: The shorter the focal length, the wider the angle of view and vice-versa.

FOCAL LENGTH: Focal length is the measurement (in millimeters) from
the optical center of
a camera lens to the camera’s sensor.

DEPTH OF FIELD: The proportion of the image that is
reasonably sharp and in focus.

DEPTH OF FIELD: The smaller the aperture you use,
the greater the depth of field.

Wide angle lenses are ideal for fitting a large area into your frame.

Wide angle lens is especially useful for landscape photography or
street photography. With wide angle lenses, almost everything is in focus,
unless your subject is very close to the lens.

Standard lens offer a fairly accurate representation of
what the human eye sees,
both in terms of visual angle and perspective.

Tele lenses are great for isolating a subject that is far away.

REFERENCE:
Title: Learn Photography
Link:https://photographylife.com/learn-photography
Title: What Is Shutter Speed? - Beginner Friendly Tutorial
Link: https://youtu.be/FdJhkRFFvUs
Smartphone VS Pro DSLR
Link: https://youtu.be/lUPGljku_kE
2.Instrustion
Introduction of Digital Photography and Imaging
3.Three of my favorite posters on the Internet
1. Bezier Game
Practice and play on this game:

2. Create your E-Portfolio blog.
E-Portfolio Link:https://yangjiayidesign.blogspot.com/2023/10/blog-post_16.html
3. Register Pinteres
Pinterest Link:https://pin.it/4CW7mJE
4. List down your 3 favourite graphic design works done by Photoshop from Pinterest.
Explain why you like the designs?
Design #1:


Choose and identify your collage's design elements to be cut out and compose it into your
own concept & story.
Collage from Insta:
1. https://www.instagram.com/collage.garden
2. https://www.instagram.com/stephen_sheffield_collage
3. https://www.instagram.com/lasantapatrona_collage
4. https://www.instagram.com/cut.and.collage
Pre compositing your collage's design elements into a composition.
Reference: https://youtu.be/2KqXGMf0HNk
Take 3 photo of your collage pre-composition and insert it on the section below
4.PROJECT 1A: COLLAGE DESIGN ELEMEN
TS
Description:I wanted to express the charm of adult women, each with her own beauty, all trying to blossom


Description:The process of girls growing up, from small to big, from unknown to mature
5.PROJECT 1A: PHYSICAL COLLAGE final review
1. PRE-COMPOSITION #1
Description:My idea is that the leaves are in the upper left corner, and behind the
leaves are fish,creating a kind of fish moving through the leaves

2. PRE-COMPOSITION #2
Description:The building is the main object, and two backgrounds are
added behind it

3. PRE-COMPOSITION #3
Description:With the building as the main object, built on the beach,
I thought it would be nice,I still use the fish as the main body, just learned the pen tool,
I thought to use the fish to do training, outline the fish will be more
trouble than others

6.PROJECT 1B: Digital Collage review

DESCRIPTION:
I used the reverse operation in Photoshop.That is to say, make the whole picture black to white,
white to black.In addition, the image itself has color, and the color will be automatically
changed.That is,
change the colors in the picture to their own corresponding complementary colors.
7.PROJECT 1B: DIGITAL IMAGING EXERCISE
INSTRUCTION:
Follow the step-by-step video to edit it in photoshop: https://youtu.be/b6XqlUP-MUA
Download the images here:
https://drive.google.com/drive/folders/1d8wBC-qsBMhnzfROB4KqtXiTlvwfy-4_?usp=sharing
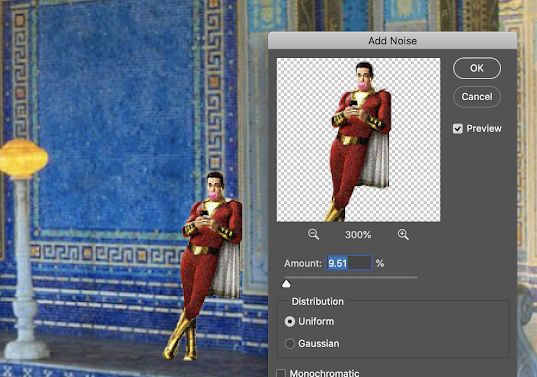
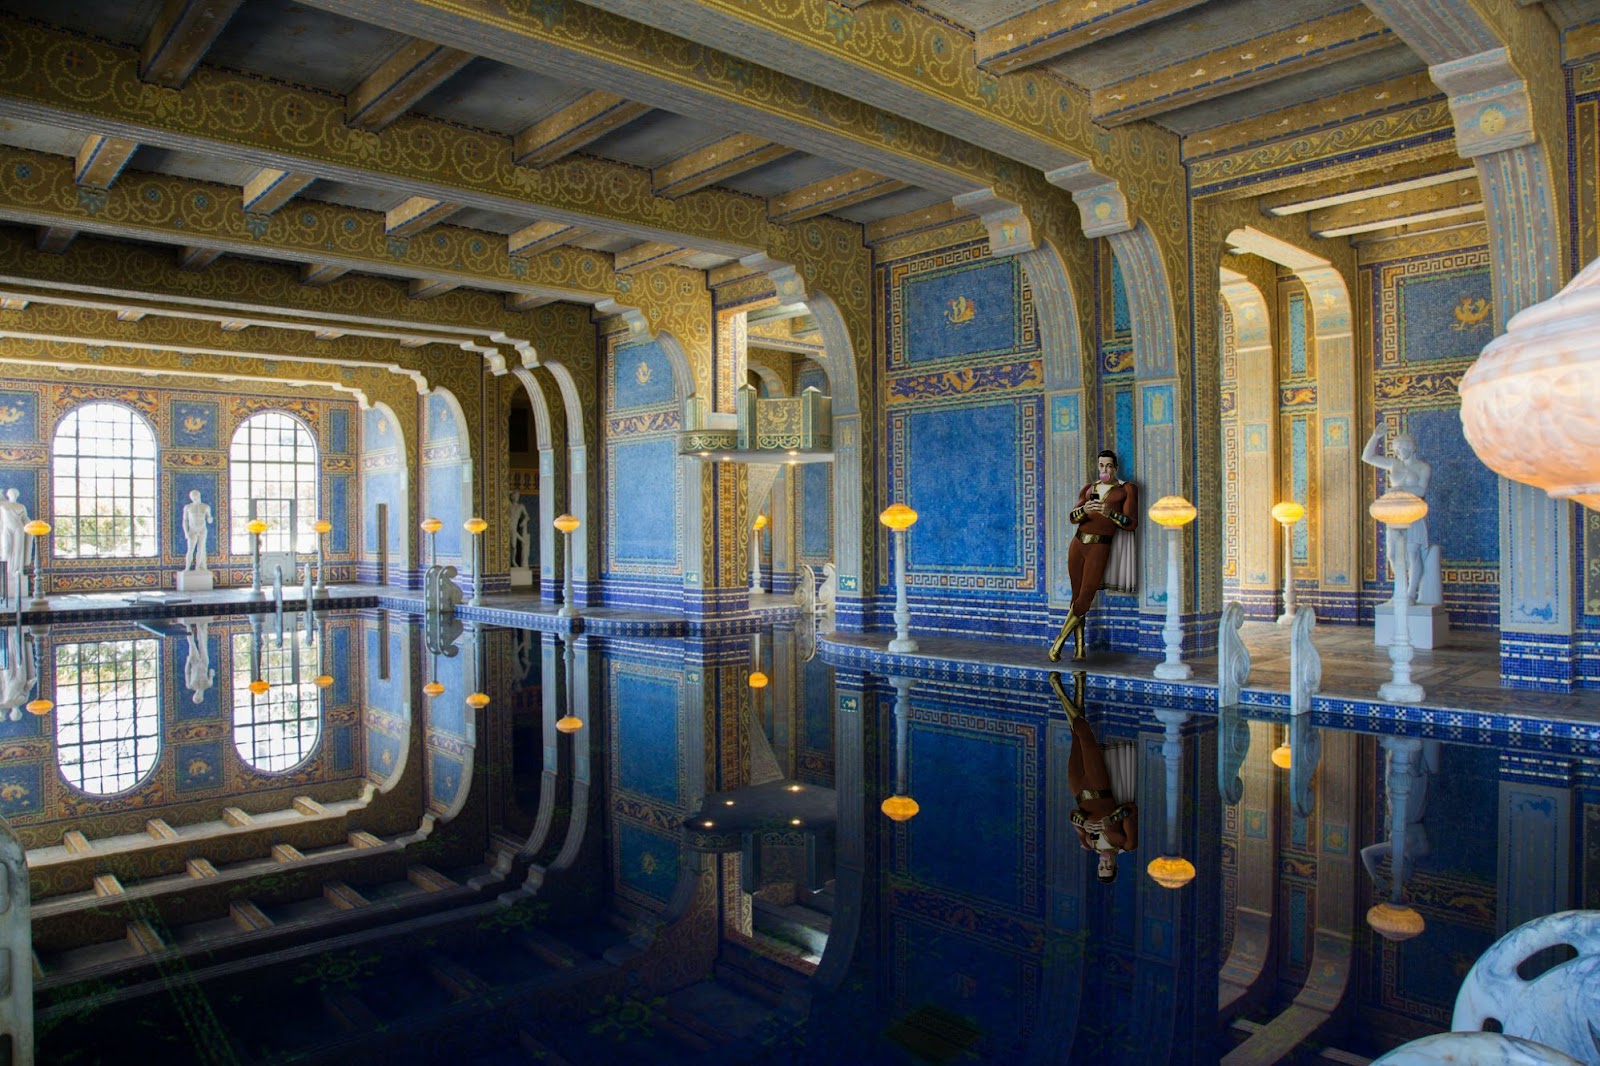
I know that I did not have the process at that time and did not take a screenshot in time, but I still continued to finish it step by step according to the teacher's video, noticed the important problems and learned how to P photos in a new environment.
Process
 |
| first outcome |

According to the overall tone of the environment, we have to adjust the overall tone of the character, so that he is not abrupt in this environment, we need to adjust the appropriate size, the reflection of the ground mapping to contrast with the original character, will be darker, which depends on the color of the floor itself to decide
OBJECTIVE: Turn B&W photo into COLOUR photo
DOWNLOAD THE IMAGE HERE: https://drive.google.com/file/d/1iYbFpDqdTjdHzkBpLWLkFwPJut6N8ItA/view?usp=sharingVIDEO TUTORIAL: https://youtu.be/DeGpKh6pMfk


process
According to the ppt and video sent by the teacher, I learned that when coloring a black and white photo, I should build new coatings one by one, apply the five features with the brush tool, then apply the color I want, and finally choose overlay in the coating to make the whole look more natural.


When I started another practice, the difficulty of this photo was the hair, which was the key to the processing of this photo, so it was necessary to treat the hair naturally, and the rest was the same as the demonstration given by the teacher


评论
发表评论