Digital Photography and Imaging - Project 2
December1,2023
1/12/2023-20/12/2023(week6-week9)
Yang JiaYi(0369288)
Digital Photography and Imaging / Bachelor of Design (Hons) in Creative Media / Taylor's University Project 2
TABLE OF CONTENTS
1.Lectures
2.Instrustions
3.Project 2A:DOUBLE EXPOSURE
4.Project2B:Product of photoshoot
5.Reflections
Intro
The fundamental principles of design are: Emphasis, Balance and Alignment, Contrast, Repetition, Proportion, Movement and White Space.
 |
| The fundamental principles of design are: Emphasis, Balance and Alignment, Contrast, Repetition, Proportion, Movement and White Space. |
 |
| The fundamental principles of design are: Emphasis, Balance and Alignment, Contrast, Repetition, Proportion, Movement and White Space. |
 |
Contrast creates space and difference between elements in your design. Your background needs to be significantly different from the color of your elements so they work harmoniously together and are readable. |
 |
| If only one thing on your band poster is in blue italic sans-serif, it can read like an error. If three things are in blue italic sans-serif, you’ve created a motif and are back in control of your design. |
 |
| Proportion is the visual size and weight of elements in a composition and how they relate to each other. It often helps to approach your design in sections, instead of as a whole |
 |
| Movement creates the story or the narrative of your work. |
 |
| White space (or negative space) is the only one that specifically deals with what you don’t add. White space is exactly that— the empty page around the elements in your composition. |
EFERENCE:
Title: 7 Principles of Poster Design
Link: https://99designs.com/blog/tips/principles-of-design
Title: 7 Principles of Poster Design
Link: https://youtu.be/qp3jHWyPW-E
& Image Blending Mode
What Is Double Exposure Photography?
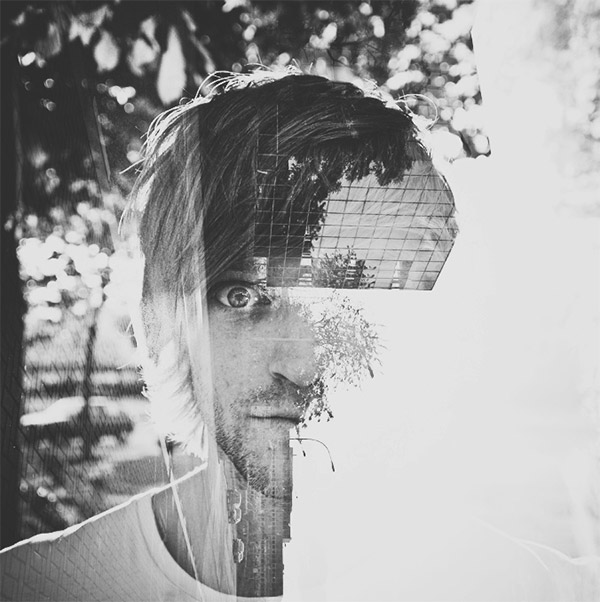 |
Double exposure photography refers to merging multiple images. The goal is to make them surreal, emotional, or humorous. They usually feature silhouettes. You don’t need a double exposure camera, as there are a few other ways you can create them. |
1. Using the Tilt-Shift Effect
If you want to be extra creative, blur one of your photos instead of the entire image. Or blur everything except for one important detail.
2. Create fake reflection
 |
There are many ways you can create reflections. One of them is creating a double-exposure with the help of a separate window photo. |
3. Experiment with simple portraits and
details textured
 |
| Combining something plain with something complicated will give you a balanced result. It will also save a lot of simple photos that you might discard. |
4. Convert your results to Black & White
 |
It gives them a unique depth and allows you to experiment with something interesting just like film photography. |
 |
| It would give you a fun and doable challenge. And an opportunity to show very creative sides of yourself. |
 |
| A random process doesn’t mean it’s not meaningful. Your results might create a story of their own, one that others will find encouraging.
7. Make simple objects look fascinating  A silhouette of a dull-looking building could become the outline of a starry sky like the photo below. This technique will enhance your imagination. 8. Use Shadow  You can do anything your heart desires with outlines of this sort. All you have to do is go out, take photos of a few shadows, and turn them into something beautiful PHOTOSHOP : Blend Modes Working with blend modes is almost always an experimental process. Because it’s nearly impossible to predict the results, you always seem to end up experimenting with different modes and Fill Opacities until you get the results you’re looking for.    A particular blending mode works really well on more difficult subjects like glass, smoke, fire and lightning. Here’s a quick guide:
 REFERENCE:
Week 9: DIGITAL SURREALISM Realism Versus Surrealism
  Surrealism Surrealism defies logic. Dreams and the workings of the subconscious mind inspire surrealistic art (French for "super-realism") filled with strange images and bizarre juxtapositions. Capturing your Dream  1. Sketch It Out 2. Find Reference Images Gathering reference images will help you greatly in realizing your new idea. Gather images that directly relate to what you have in mind. 2.Instrustions finnal work process    Exercise 2: My own version of Double Exposure portrait finnal work 4.Project2B:Product of photoshoot a.ReferenceMood Board  reference1.1  reference1.2  reference1.3 https://pin.it/3tFpcPj b. Summary of My Ideas Write a summary about your idea First design sense The teacher said that the homework was not shot by myself, but needed to be shot by myself. I re-did a version. The first one designed an orange and a branch, and I separated the orange separately to form the appearance of petals Second sense of design The second design is radish and knife, put together, in fact, what vegetables can be, to long strips, I have carrots in my hand, I put them together, referred to as radish knife, in China is a very hot small toy  Third design inspiration The third design is a pencil head and an umbrella, the top tip of the umbrella can be made of a pencil head c.Sketches  sketches1.1  sketches1.2  sketches1.3 d.Decide on the final actual drawing  actual drawing1.1  actual drawing1.2 e.process  process1.1  process1.2 f.finnal work  finnal work1.1 5.Reflections When I see so many creative designs on the Internet, I will sincerely admire the designers. I refer to many photos to get my own feelings and works, learn the most important function of cutting mask in ps, and gradually get familiar with the function of selecting and covering. When two unrelated photos are pieced together, I think it is very interesting. After the work is done, I will have a sense of accomplishment |


评论
发表评论